
Behind again with everything but thank you muchly for tin comments. I fear that from next week onwards I should (in theory) have an even lower presence in the ether as life ramps up the busyness stakes. Sorry if it seems very arrogant to be posting posts but not replying - that is not the intention.
This might not be your best option but I thought that I would try and put some sort of tutorial together for making a purse of your own design. I use the term 'tutorial' guardedly - 'tutorial' is a word that has connotations of instruction, learning, skill, deftness, clarity, guidance and 'ta dah'ness' - none of which apply here!
You may regret reading this....
This is my finished version using the free purse frame with Mollie Makes this month.

Inside:

Warning - this is fiddly and the purse is tiny (measures about three inches from tip to toe). Do not make this if you are feeling a bit stressed and grumpy - this WILL NOT MAKE YOU FEEL ANY BETTER!!!!
Making it might make you feel a little bit wor..
First make your template by drawing around the frame - the outer edge of the frame will be your final stitch line. Mark the centre point of the frame and also mark where the bottom edge of the hinge is.
Like this:

Your drawing will not be wobbly like mine

I have inserted the protractor as an afterthought (to try and fashion some semblance of symmetry....can you see that I have NOT created a 60 degree angle). Basically consider how long/big you wish your purse to be and drop a line from the frame to suit (that said TRY and keep a sense of proportion - it would be daft to have a suitcase-sized purse on a frame like this!!!!!). I have folded my piece of paper in half to ensure that both sides are the same!

Cut out your paper pattern - marking the centre and those hinge marks that you made previously.

Choose your fabric - this is a teeny tiny scrap (leftover from making dinner-money purses for Bronte and Maille).
Evidence of pre-made purses (I note from the photograph I made these two years ago...best keep the scraps for a while)

Note how I am encouraging 'cidre' purchase by children!!!!


Interface your fabric if you wish something less floppy. Make the same for the reverse (I was not too happy with the back so not shown this bit off!) and pin right sides together. I have put the pins in where the sewing needs to start and stop (basically you are only going to sew the bottom half at the moment).

Your sewing will start just below the hinge line and follow round until you meet the other hinge line
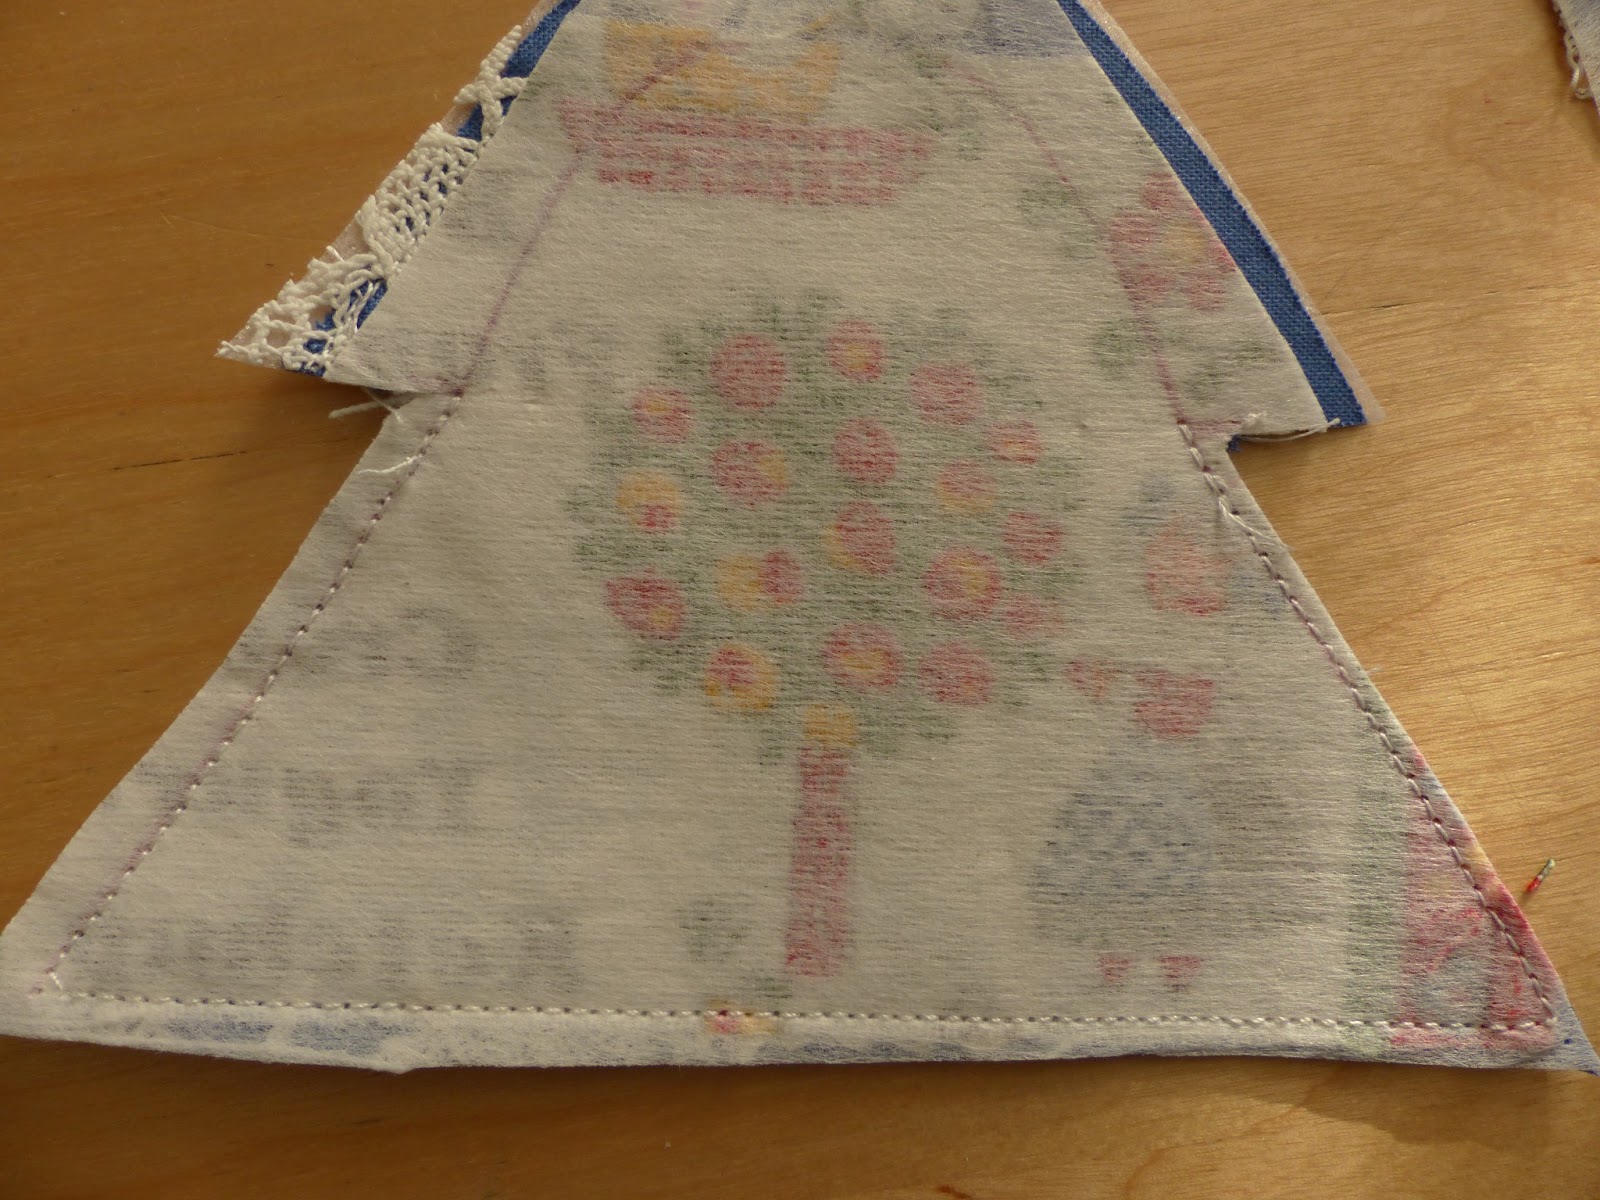
Do initial trimming (so that it looks like a Christmas tree)

You can skip this bit - EXTRA FIDDLY AS THIS PURSE IS SMALL - fold seams together, squash and pin. Pluh-eeese make sure your seams are aligned - you bottom will look AWFUL otherwise. NOBODY but NOBODY likes an AWFUL BOTTOM!!

On this scale I used a 1.5 cm stitch across the seam. DO NOT CUT IT OFF YET

Turn back to the right sides and check that YOUR BOTTOM IS ALIGNED.
I WILL NOT BE HELD RESPONSIBLE IF YOU DO NOT CHECK.
BOTTOMS SHOULD ALWAYS BE ALIGNED.

Double checking alignment.
Phew.
I am indeed aligned

Now you can safely snip the snips and turn it inside out (so the right sides are now showing)

Choose your lining fabric - to be honest all of this was a bit of a rushed choice as the light was fading and I knew that I really had to start getting the dinner on.
This was an old sheet
Cut just the same as the outer pieces.
Sew as before BUT this time leave the section at the bottom free as this you will need to enable turning inside out at the end.
You will be swearing if you forget and merrily sew right through.
I have done that once or twice....AHEM!

Extra fiddle faddle as you now put the outside pieces inside the lining - but ensure that this is inserted so the inside and outside 'shells' have fabrics RIGHT SIDES TOGETHER.
I am sorry that I am shouting so much but I am merely reflecting REAL LIFE
If children are in the vicinity just keep smiling sweetly, pretend that everything is going swimmingly and just as you planned.
"Sewing this small size is a real treat" !!!!!!
"I really must sew in miniature more often"
"...it is a real joy so to do..."

I have swapped to a zipper foot in order to try and see what $^"$%£ I am doing at this point. To be honest this bit is mainly done by sense of touch (don't laugh - this is true). Not only are my glasses USELESS (and I did go to SPECSAVERS) but the sewing machine is USELESS too. A double whammy which means the sense of touch goes into overdrive - and the light was fading don't forget (light on sewing machine is no better than a lit match!)
"Bronte come and hold this lit match...do not roll your eyes and do not ask why"
The top raw edges are now all that remain to sew - and this sewing needs to butt up against the sewing that you did previously. Try not shout at the children at this point - it is not their fault that the matches burn down so quickly. So sew (so sew!!! sounds like a song!) along the top edges CAREFULLY. All should be well because at least YOUR BOTTOM IS ALIGNED AND THAT IS WHAT REALLY COUNTS

Trim like Billy O - going as close to the wind (aka seam) as you dare - try and debulk (I have been trying to do that for years....) as much as possible.

Because you remembered to leave open the bottom seam of the lining you can now shove the outer pieces through that gap. You did leave that open didn't you.....you didn't...cripes...you are in a pickle....
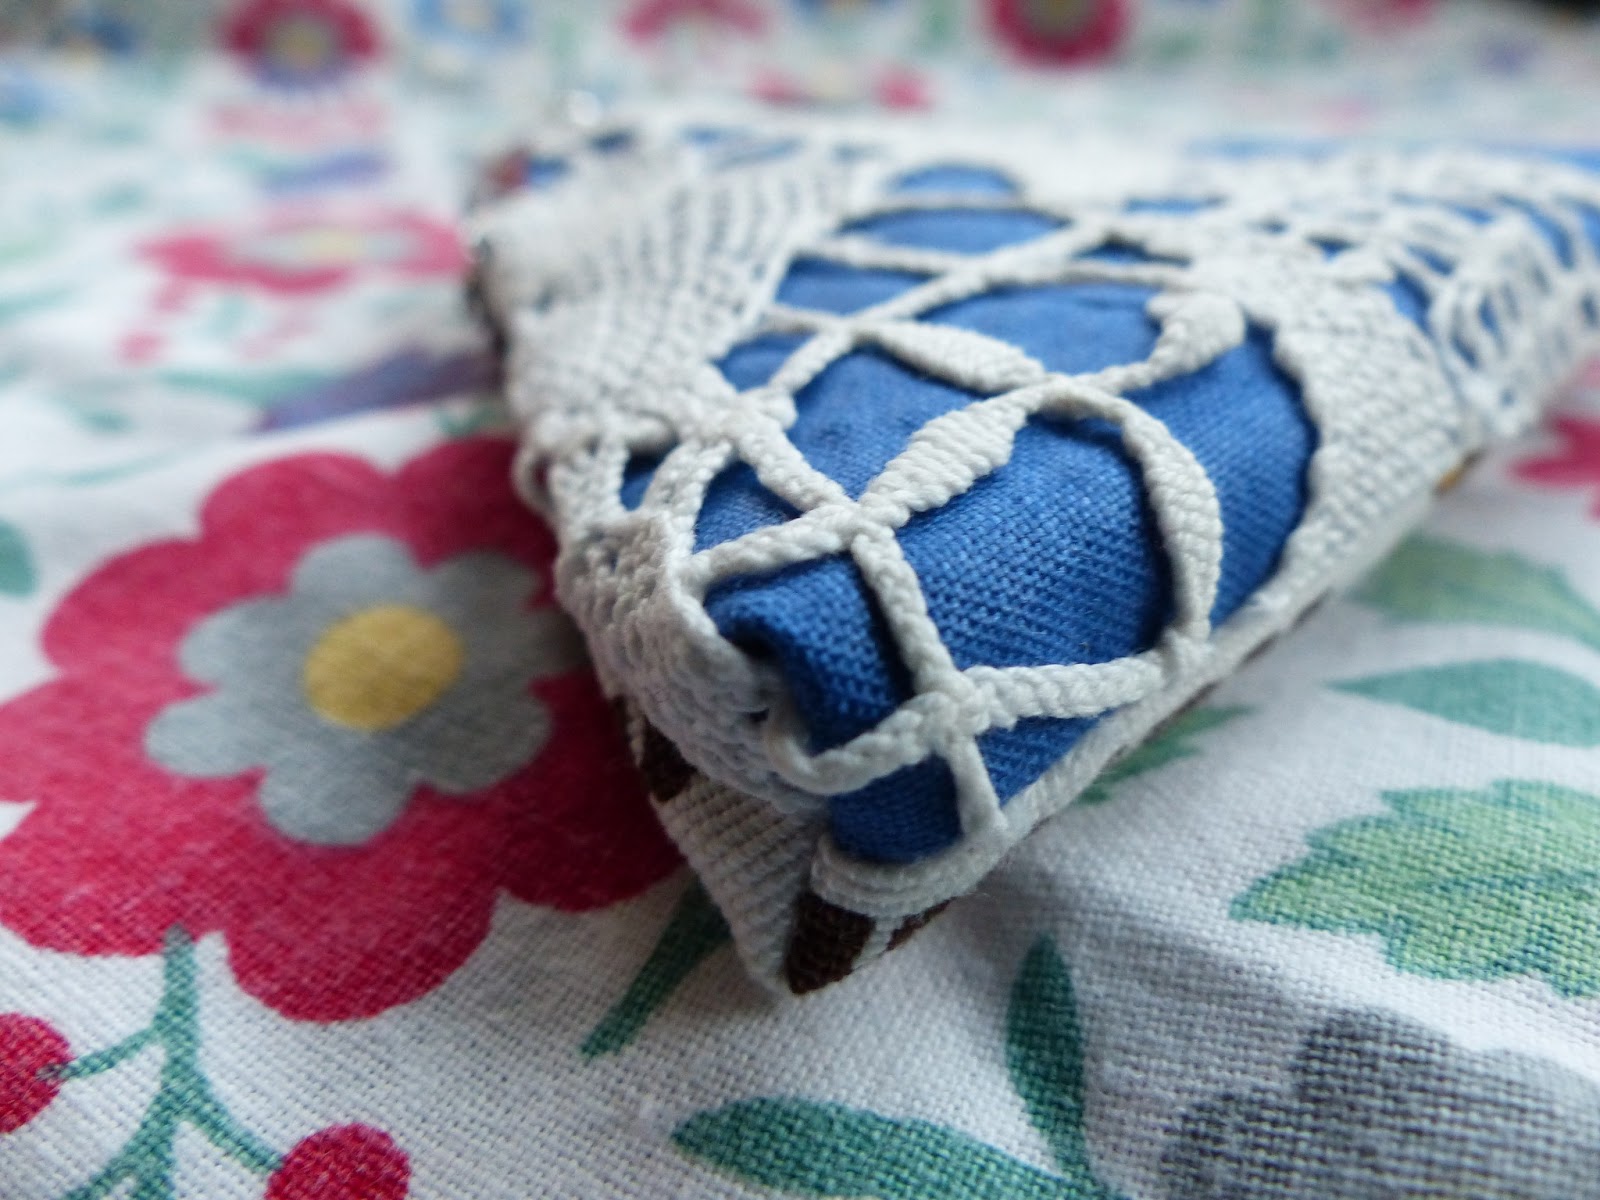
Please note that the pen mark on the ruler was NOT created by my good self but some soul many years previously. It was as though s/he knew that several decades later some poor old woman with dodgy eyes would need that EXACT mark.
Who knew!

At this juncture I had to stop to get the dinner on - I then forgot to take any glue photographs!
For this frame the glueing is the easy bit - the frame has plenty of space for your sewing. Put your glue inside your frame channel and put in your purse! Do one side at a time and allow about half an hour for each side to dry (I speed this up by putting it in the airing cupboard)

Go on - admire you bottom again - you deserve it

All done

This is the reverse that I was not tooooo happy with
I will show a little bit more...


Showing my large thumb in order to gauge the scale of this thing!
Neither use nor ornament....

I you do make one please let me know.
"Funnily enough Jenny you have put us right off....."
Bottoms Up
PS: This is the link to the purse that I made a couple of years ago from the last time MM had a free gift! This was a Christmas version here: Another Mollie Makes purse
Disclaimer: 'I hereby refute all claims of injury, relationship rift, arguments, rows, emotional distress and match burns that this 'tutorial' may engender. I am not liable for any purse malfunction, financial loss, BOTTOM MISALIGNMENT or disfigurement of any kind'
Oh, you do make me laugh!
ReplyDeleteNow, I am, of course ...
(a) mortally offended that you do not reply to my comments
(b) never ever going to attempt to make a purse after reading your tutorial ... it sounds far too complicated and you have put me off for life
(c) going to be constantly checking my bottom for misalignment
Thinking about it, perhaps (b) is a good thing ... if we all made our own purses clever crafts people like you would never sell any!
You sound crazy busy ... don't overdo it. M x
Dear Vintage Jane - it has indeed taken me a while to reply but thank you indeedy for your kind words about my bottom! I wish that I were one of those clever crafts people but sadly I have not sold a thing for months!
DeleteThis is exactly why my proper' jog has to be maintained at all costs....back to that grind stone.
Best wishes
Jenny
Couldn't stop reading...... Not that I needed a purse but to know someone else suffers and feels the same as me when making things. At least you finished and ended up with something. I would of given up 5 mins after starting!
ReplyDeleteI love these little purses but make a note to myself - I WILL NEVER ATTEMPT TO MAKE ONE.
Rosezeeta
Oh dear Rosezeeta I hope that I haven't put you off entirely. I think that I may have over emphasised certain elements and it is all a piece of cake to make!
DeleteGive it a go but perhaps not use my guidance but something with clarity!
Best wishes
Jenny
Hello:
ReplyDeleteIt will come as no surprise that we were totally lost from the very outset. Men may walk on the moon but that does not necessarily follow that, notwithstanding your detailed and well illustrated 'tutorial', it is given to us all to fashion purses from Mollie Makes or even Custards Creates!
Dear Jane and Lance
DeleteI am staggered that you are not keen purse makers! I had it in my head that you both busies yourselves in the evening with purse creating. An illusion dashed....
Best wishes
Jenny
Lovely purse, now I will go away and and attempt to make my own!
ReplyDeleteJulie xxxxxxxxx
Oh please do Julie - that is exactly what I have always wanted this blog to be and instil in others (that sounds a bit grand!)
DeleteBest wishes
Jenny
I never show my thumbs in public.
ReplyDeleteDaisy J
It is best - you are right...
DeleteNow I've finished muttering jokes about misaligned bottoms to myself and got those out of the way, I can say that I very much like your purse, and think your 'tutorial' is rather clever. I made the purse that came with one of the very early issues of Mollie Makes - being a novice crafter at the time - and seem to remember getting in rather a mess with the glue. Nonetheless, I still use the purse, have the new kit too, and will be giving it a bash, before attempting another with my own fabric, thanks to you. I just hope I'll be able to get my own large thumbs inside to reach the pennies when they are finished! x
ReplyDeleteThank you kindly Anna - I look forward to seeing your new purse. I think that the fabric given free with the magazine is fine but so much better if you can use something that is unique to you. They are fiendishly small!
DeleteBest wishes
Jenny
Ha ha brilliant tutorial Jenny, I bought my copy last night and just like you thought that I would use fabric instead of oil cloth. This is great but does look like it needs time and patience... I guess it will have to be put on the long list of projects that need those 2 ingredients then! xox Penelope
ReplyDeleteDear Penelope
DeleteIt may be me being a bit useless in the first instance!
I look forward to seeing your purse
Best wishes
Jenny
Haha, your is brilliant Jenny, but somehow I don't think I'll be bothering! Sewing not one of my best talents in any case ... How lovely too, that Bronte and Maille have their very own, handmade dinner money purses! Lovely idea xxx
ReplyDeleteThank you kindly Claire - my sewing only ever involves straight lines so I am sure that you could make one too
DeleteBest wishes
Jenny
Thank you for that. I was thinking of making a very long skinny one with mine to hold long skinny things (crochet hooks or knitting needles) I don't mind a wonky bottom, better than a shabby back side!(not that I'm suggesting yours is shabby) EE xx
ReplyDeleteNow that is a very good idea - I had thought about one to keep my glasses in but too small for that!
DeleteMy bottom is neither wonky or shabby!! Ho ho
Best wishes
Jenny
Great bottom! I always wanted to make one, but I got stressed and needed a cigarette just reading the tutorial (I don't smoke...yet), so I think I'll just admire yours and buy one from Cath K! I'm crafty, but my fingers are as nimble as they used to be! Yours is gorgeous tho! Love your blog! Just found/followed you a few weeks ago!
ReplyDeleteThis made me laugh greatly - I too might take up smoking just to get through the stress of it all! Did you see the old post of mine where I show off the purses that Cath K commissioned from me!! Fame but no fortune...
DeleteThank you for calling round
Best wishes
Jenny
I always wanted to know how to make one of these purses Jenny....thank you for your tutorial and I shall definitely be having a go.....later :)
ReplyDeletex
Thank you kindly Barbara - please send a photo of your purse when completed
DeleteBest wishes
Jenny
I enjoyed your tutorial and fabric choices. I have only attempted one 'make' from Molly Makes - a wallet which was correct in every detail except that it was completely inside out. Which tells you everything you need to know about my making brain.
ReplyDeleteNow that is just the sort of thing that I would do and then shove it in the bin with frustration!
DeleteTake care
Best wishes
Jenny
Oh I resisted this magazine this month now kicking self. But brighter note I have got the same design doily as you! Mine has just been cut up to make a butterfly head decoration for the latest doll. x J
ReplyDeleteHello again
DeleteI shall pop round later to see your doll
Best wishes
Jenny
Oh heavens! first Mary Berry says I MUST NOT have a soggy bottom, then you say I MUST have an aligned bottom. There are definitely Fundamental Issues here.
ReplyDeleteBut I do feel that a tiny purse is ideal for a small woman with a minuscule income like myself.
Sorry Angela but some things just have to be said!
DeleteIndeed a small purse - holds about 20p!
Best wishes
Jenny
Jenny,
ReplyDeleteyour bottom is much admired, when we met in Chichester at the fayre, we talked about purse tutorials...and I STILL havent made any despite buying ...cough, cough, a, cough few frames to make lovely purses. It all seemed like a good idea at the time. I (think) I understand the tutorial, working away at present so dont have much time to craft/sew. But have new found confidence now (you think??). Will post pictures when I make one. Dont hold your breath, blue is such an unattractive colour.
Hooray - the purpose of this blog is to 'inspire' (very loose use here)!! I look forward to seeing your creation and keep in touch
DeleteBest wishes
Jenny
Enjoyed the tutorial Jenny and seeing your brilliant effort but I'm afraid you lost me at the aligning bottoms part and I might have to give this one a miss! Your purse turned out brilliantly though!
ReplyDeleteThank you kindly Anne - I may have over complicated it!
DeleteBest wishes
Jenny
I won't be buying Molly Makes as the purse is too "wee" for me but I did buy a couple of "clasps" a while back and now with your help I can have a go at making my own "vintage" purse. I still love mine that you very kindly made me and it's much admired whenever I use it, Lucey xx PS I've just remembered I have the perfect fabric do you think it's too late to start sewing at 8.40 PM??? lolxx
ReplyDeleteYay - purse making a go-go I think Lucey!
DeleteBest wishes
Jenny
PS Never too late to sew
PS Just read the comment from Ethel Johnson who says about making long skinny purses for knitting needles etc.....oooohhhhh the possibilities are endless, or it will be when I get the hang of it!!
ReplyDeleteLucey x
Nice one! Funny thing about the Mollie Makes little gifties is that I never do them. I have a drawer stuffed with unopened freebies. But I have made a purse of my of my own - albeit larger than that atom sized gem. It was a catastrophe.....not too enthusiastic about giving it another go. I seem to recall a mess of glue and a purse frame stuck to my fingers. Not a pleasant memory. But I do like your very funny tutorial. :)
ReplyDeleteOh dear...my tutorial was written with my serious head on....back to the drawing board....
DeleteHo ho
Best wishes
Jenny
Oh good grief I seem to have had a hiccup up there...sorry...somehow I am pants at doing comments on the iPad. It took yonks to do it.
ReplyDeleteHi Jenny loved your tutorial and laughed out loud at the match thingy!I will NEVER try to make something that involves anything vaguely mathematical,I haven't got a protractor anyway!!You must have sooo much patience to do all these things.LOVE LOVE LOVE your blogs.'bye for now Pam.
ReplyDeleteThank you as always Pam - I have no patience whatsoever but I determination wins through!
DeleteYou are very kind dear Pam
Best wishes
Jenny
Thankyou for your tutorial that made me giggle all the way through. I have this kit and wasen't going to bother making it up, but mmmmm...I may give it a go...but when I am feeling calm and have a bit of quiet time....especially if I can't get by bottom into shape! Thankyou for sharing and your person is gorgeous!! Karen x
ReplyDeleteHahaha I mean 'PURSE', although I am sure you are too! Karen x
ReplyDeleteFinger slippage!
Deleteoh well done, what a hero! nice idea to use a tea towel? very inspiring! Heather x
ReplyDeleteThank you kindly Heather - I am sure that there is a more simple method!
DeleteBest wishes
Jenny
Tee Hee....You had me in 'STICHES' pardon the pun, with this post Jenny! Always glad I tune in here as it is always such a pleasure too! ~ On to the wee purse, Ooh thanks for sharing.....But I'll not bother!! I love your material you used on yours for the girls!! ~ As for fitting us all in ~ IT's just wonderful that you do!! ~ Leaving you as always Smiling! :) Maria x
ReplyDeleteThank you kindly Maria - you are always generous with your words
DeleteBest wishes
Jenny
Oh good grief Mrs Custard, now I'm going to have to buy a copy of MM so I can try out Ethel's knitting needle/crochet hook purse suggestion ... I need somewhere to keep the tiny crochet hooks I use for beading my knitting!
ReplyDeleteOh, and do you have a tutorial for the debulking of those with misaligned bottoms perchance? That's what I really need!
(Jen, did you manage to sort your no-reply blogger status? If not you just need to click on the down arrow top right and open and edit your Blogger profile to allow your email to be shared. Then when you comment on other blogs folk get an email address to respond to if appropriate :) )
Thank you for your advice Annie - all sorted now I think.
DeleteI am still working on the debulking thing....
I look forward to seeing your crochet holder - that is an excellent idea
Best wishes
Jenny
Well now I'm exhausted after reading that - much as I've always wanted to make a frame purse I think I'll try something a little bit bigger! Saying that I'm sure it will come in useful for so many things - mice biscuits ;)? Great post though and I've had a right old chuckle. Thank you x Jane
ReplyDeleteSorry for exhaustion Jane - the whole thing is hard going!!!! Yes indeed - bigger is better in this instance I think.
DeleteThank you for your kind words
Best wishes
Jenny